Creating this blog
I wanted to create a personal page that was easy to maintain in markdown and quick to set up. I came across and was inspired by Andrej Karpathy’s simple Jekyll blog
Installation
Jekyll is written in Ruby. Gems are code you can include in Ruby projects such
as this blog.
So first, we install Ruby and other requirements. I am on Ubuntu so I use
the apt package manager. In addition to ruby-full we install build-essential which includes
GCC compiler and Make which are required by Jekyll.
For other OS, check out their installation
page. We also set appropriate paths in the bashrc for installing gems.
sudo apt-get install ruby-full build-essential
#Avoid installing gems as root user. define GEM_HOME, add to gems/bin/ to PATH
echo '# Install Ruby Gems to ~/gems' >> ~/.bashrc
echo 'export GEM_HOME="$HOME/gems"' >> ~/.bashrc
echo 'export PATH="$HOME/gems/bin:$PATH"' >> ~/.bashrc
source ~/.bashrc

gem install jekyll bundler
Jekyll is itself a ruby gem: If I run which jekyll, it should return ~/gems/bin/jekyll
Using Jekyll
Now, we should be able to spin up a quick blog in command line using
jekyll new myblog
cd myblog
bundle install #install gems in Gemfile into ~/gems/gems
bundle exec jekyll serve #should now see
Now we should see a functional blog at http://localhost:4000. Let’s turn it into
a fancier Jekyll theme.
Inside this myblog folder, you will see that Gemfile is used to specify the
version of Jekyll and other Ruby gems. For instance, we will need to specify the
Jekyll theme (which is a gem) so that bundle can install it. For instance: I chose to
use whiteglass.
#inside Gemfile
gem "jekyll", "~> 4.2.2"
#gem "minima", "~> 2.5" #minima is the default theme
gem "jekyll-whiteglass"
Next I followed the instructions on the whiteglass repo. To recap:
- Change theme in Gemfile to
jekyll-whiteglassfromminima - Edit
_config.ymlto use the theme and plugins - Copy some adhoc files from the theme repo
remove the files
index.markdownandabout.markdownthat come with Jekyll default blog, since it will conflict withindex.htmlandabout.mdfrom the whiteglass theme. Now runbundle installandbundle exec jekyll serveto see the new theme.
Github Pages
The whiteglass repo recommended Travis CI for hosting the blog, but it seemed to be credit-based, or
might require payment in the future, so I chose to use Github Pages. First,
we turn our repo into a git repo:
git init
git branch -m main #rename master to main

##create your repo in github.com first, then add it as origin like so:
git remote add origin git@github.com:axucar/myblog.git

##do your add and commits
git push -u origin main
If we use the standard Github Actions (by renaming repo to username.github.io)
, it will work for the minima theme but not our whiteglass theme (see supported themes)
I used the starter Github Actions deploy template from MichaelCurrin.
Specifically, I just copy .github/workflows/main.yml into our main myblog folder.
As soon as we push this .yml file, Github kicks off a workflow run GH Pages Deploy
under Github’s Actions tab. After 2 minutes or so, it will publish the ouput into gh-pages branch.
Next, we need to go to Settings of the repo and select source: gh-pages (root).
This will kick off a second workflow run pages-build-deployment
Notice however that our blog is deployed but clearly missing any styling.
I noticed that in developer tools (“Inspect” on Chrome), the assets folder containing CSS was
not appearing inside the myblog folder.
The way to get around this is to set baseurl and url in _config.yml.
baseurl: “myblog” #(ie. name of Github repo )
url: “http://username.github.io”
Upon pushing this change, Github will again kick off GH Pages Deploy and pages-build-deployment
workflows. Then, you will be able to see a properly rendered blog at username.github.io/myblog
Custom Domain
To spice things up, we should set a custom domain name.
- Add CNAME file in repo, with custom domain
- I used Google Domains:
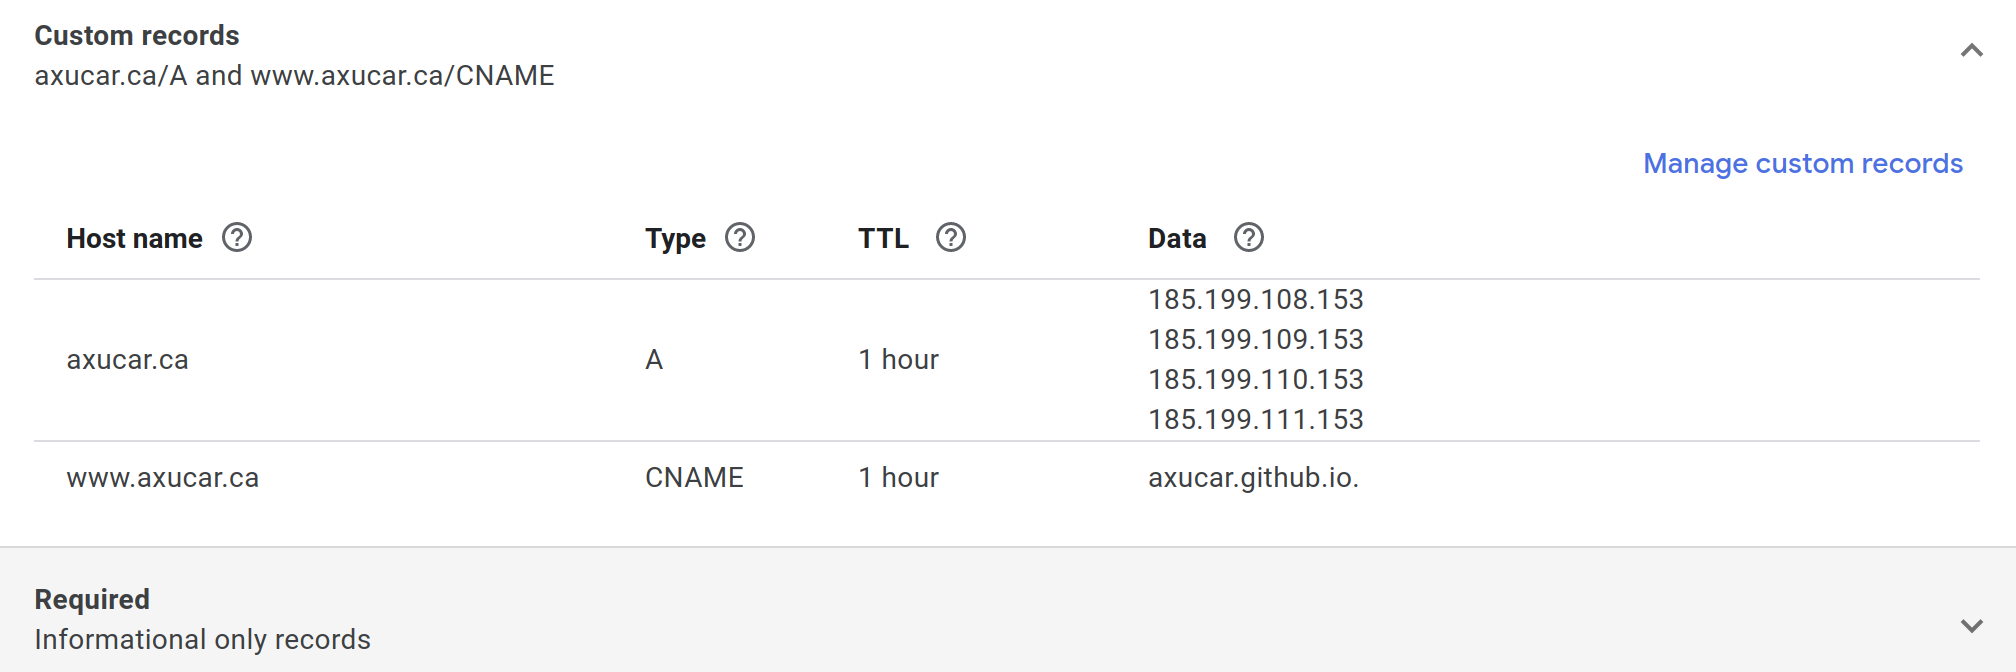 Note: At first I thought
 Datacolumn should point tousername.github.io/myblog. I suppose it’s sufficientusername.github.iosince theCNAMEfile is unique to the repo. - The CSS was again not rendering in the right place, so I modified the
_config.ymlto be:
baseurl: ""
url: "https://axucar.ca" #custom domain name